Important information: this site is currently scheduled to go offline indefinitely by end of the year.

[Tutorial] Ripping PS2 3D Model with picture

Post questions about game models here, or help out others!
Trishty
advanced
Posts: 63
Joined: Mon Jul 05, 2010 2:37 pm
Has thanked: 7 times
Been thanked: 15 times
Contact:

[Tutorial] Ripping PS2 3D Model with picture

Post by Trishty »

Image
Source: http://www.spriters-resource.com/commun ... ?tid=20541
Special Thanks o0DemonBoy0o

Tool need:
PCSX2
Texmod
XnView
3D program

Click Picture to Enlarge
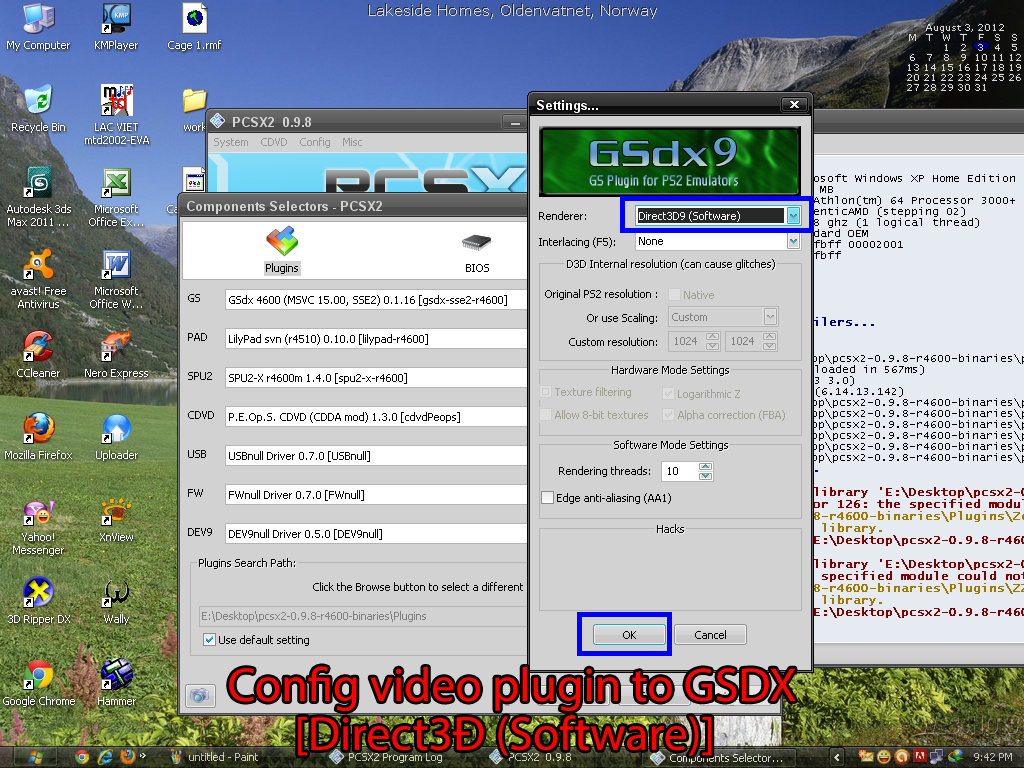
Setup PCSX2 with all the default plugins.
in the plugin settings set the GSdx renderer to "Direct3D9 (Software)"
Image
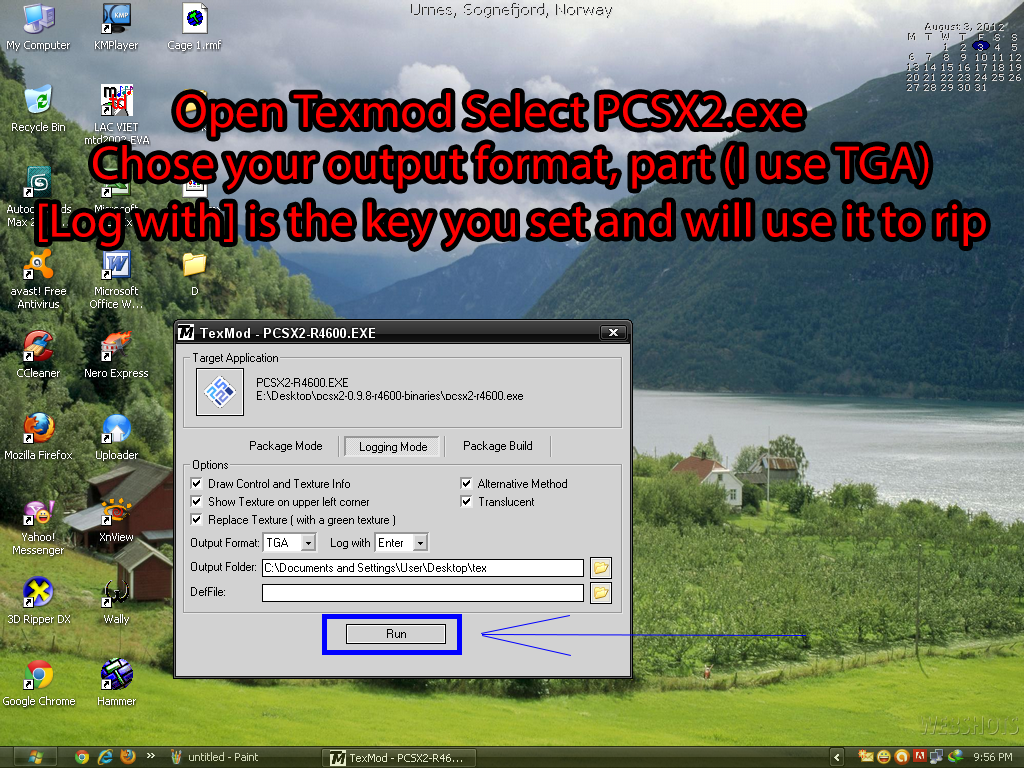
Now save, exit, and open up Texmod
click on the folder icon and goto where you installed PCSX2 and select the pcsx2.exe
now go to logging mode and make sure Draw Control and Texture Info, Show Texture on upper left corner, and Replace Texture (with a green texture) are all checked.
on output format set the type that you want, I use TGA, and on Log with set the key that you want to capture the texture with, I use ENTER.

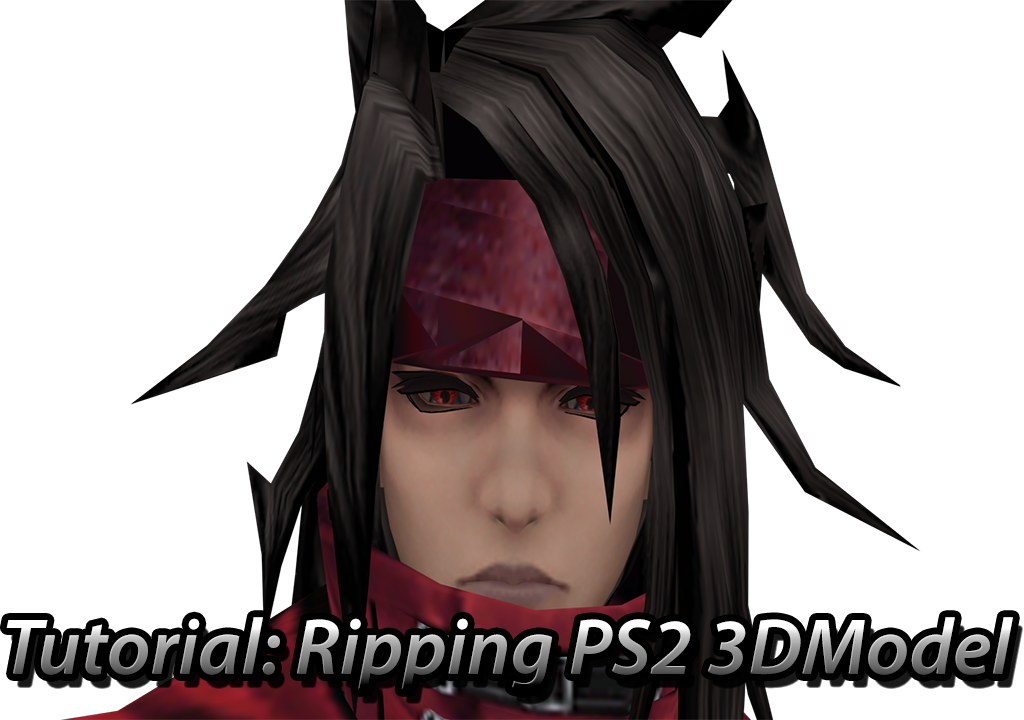
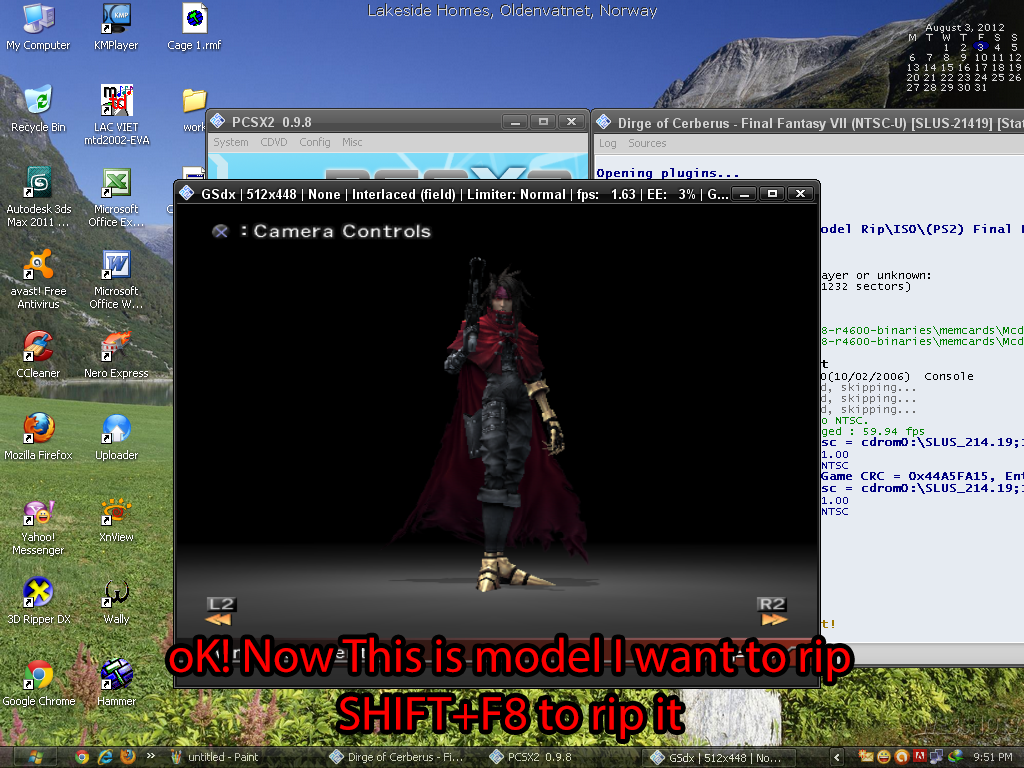
Alright now click run and open the game you want the model from. I will be using Dirge Of Cerberus.
Image
Once you are at the point in the game where you want the model press SHIFT+F8 to capture the scene.
Image
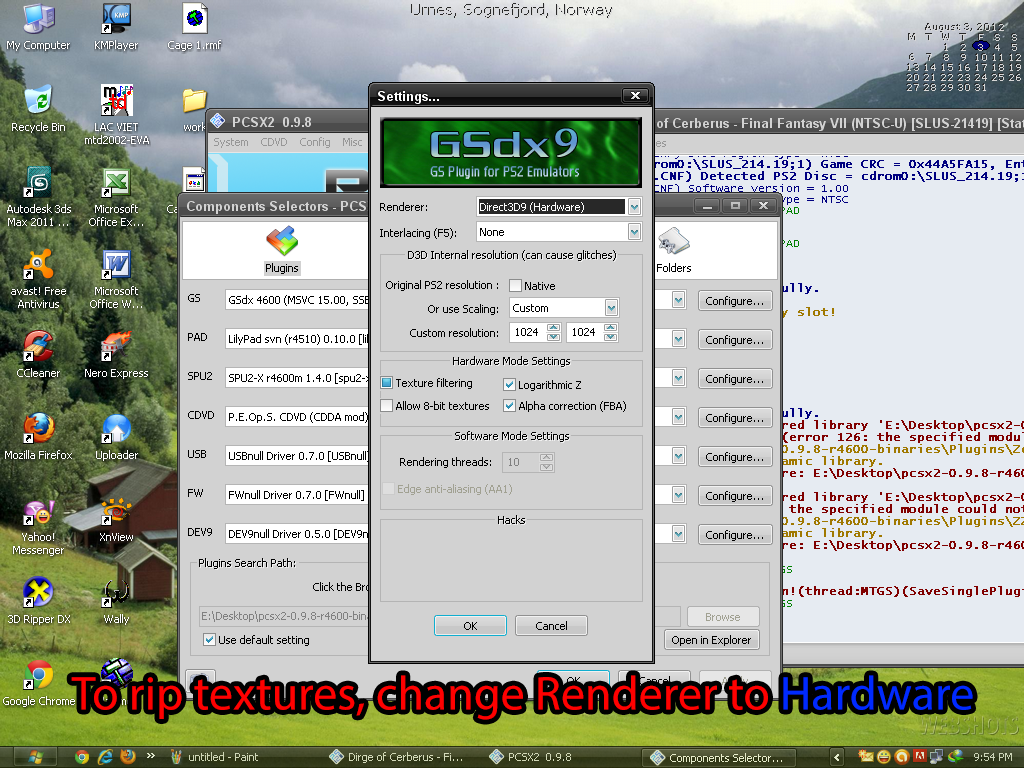
Now go to config in pcsx2 and select Video(GS)>Plugin settings and change the renderer to Direct3D9 (Hardware) and push ok.
Image
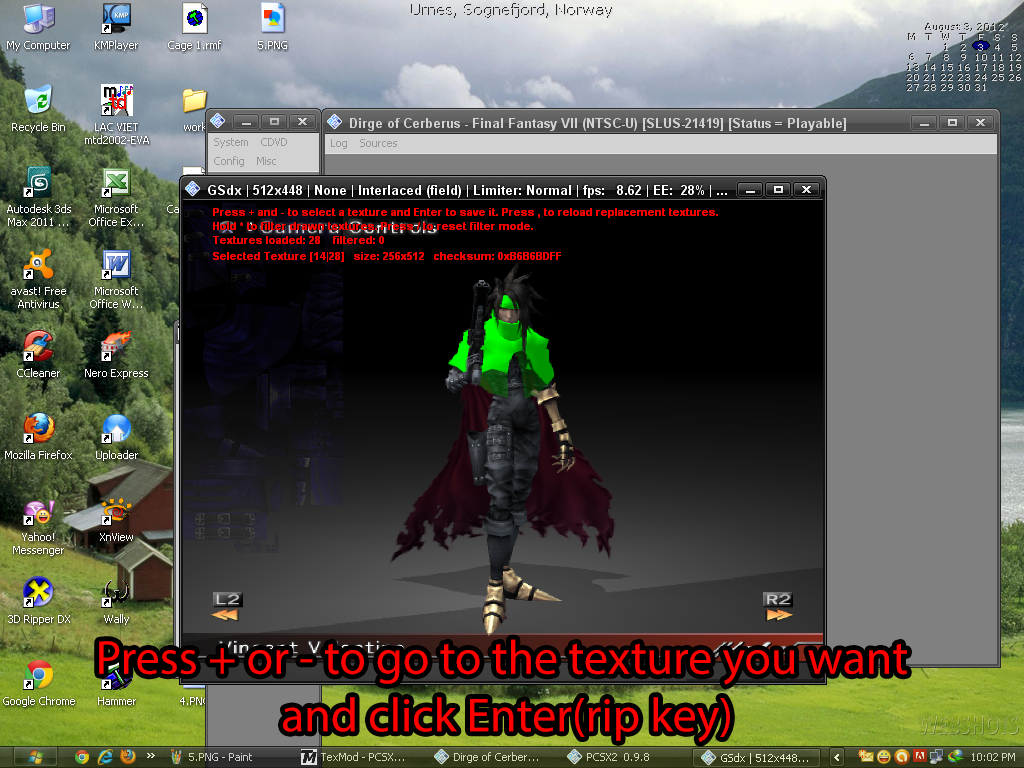
now use + and - to go through all of the textures. you can press * to go through the textures that are currently visible on the screen.
Each texture you find will be replaced with a transparent green one like this
Image
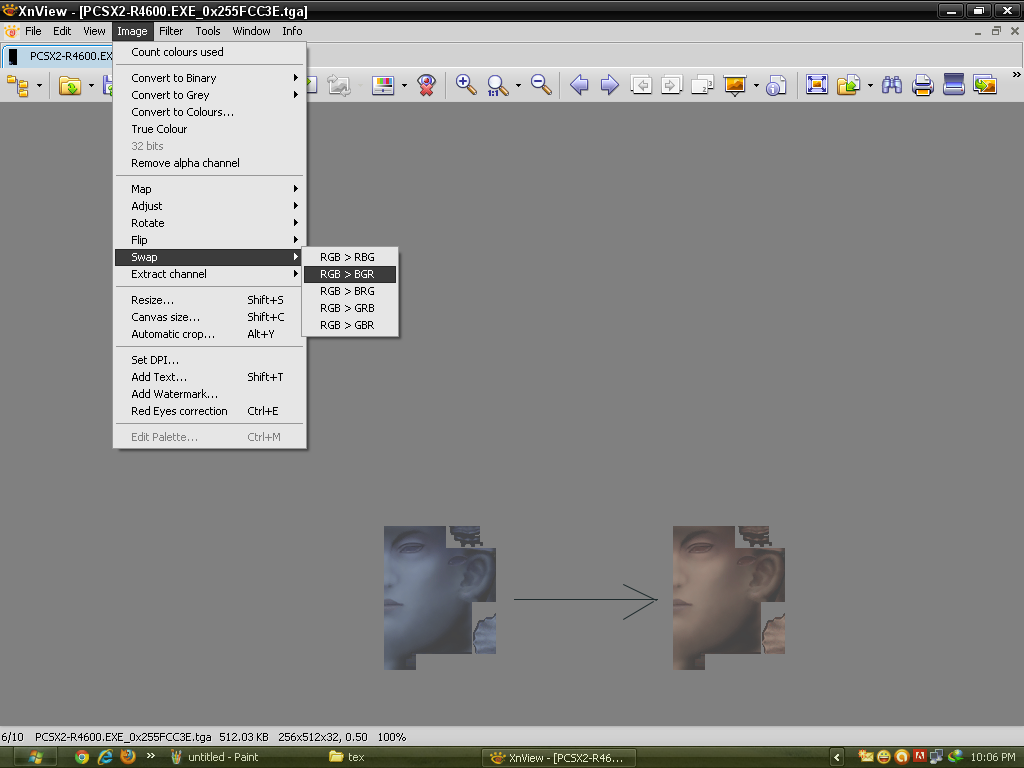
Use XnView open .tga -> Image -> Swap RGB->BGR
Image
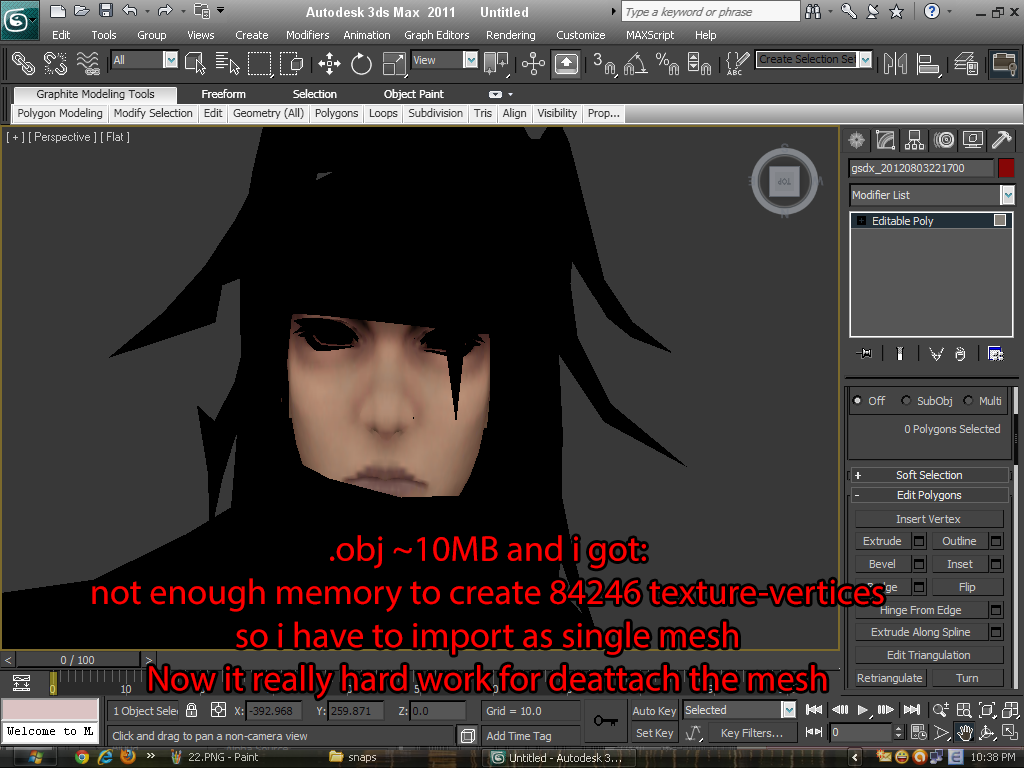
Now go to where you installed PCSX2 and open the snaps folder. In there you will find a snapshot of the scene you captured, a .gs file and an obj file. open the obj in your 3d program.
Image
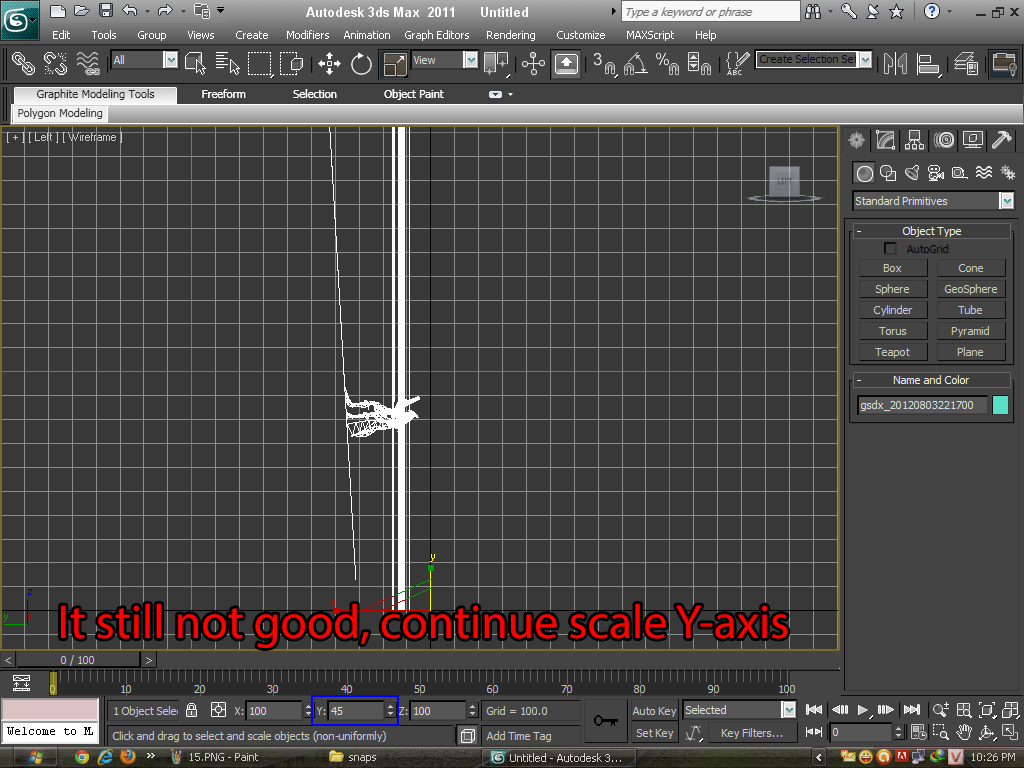
now when you open the model it should look really long like this
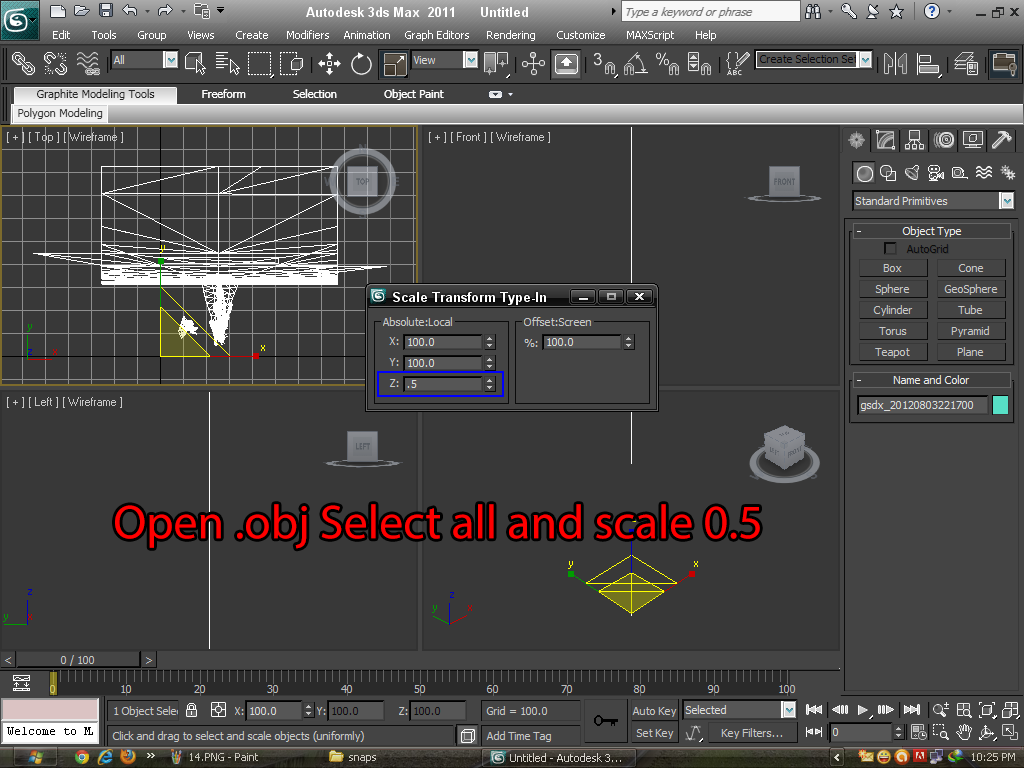
just select all of it and scale it by it's y-axis until it stars looking normal
Image
Image
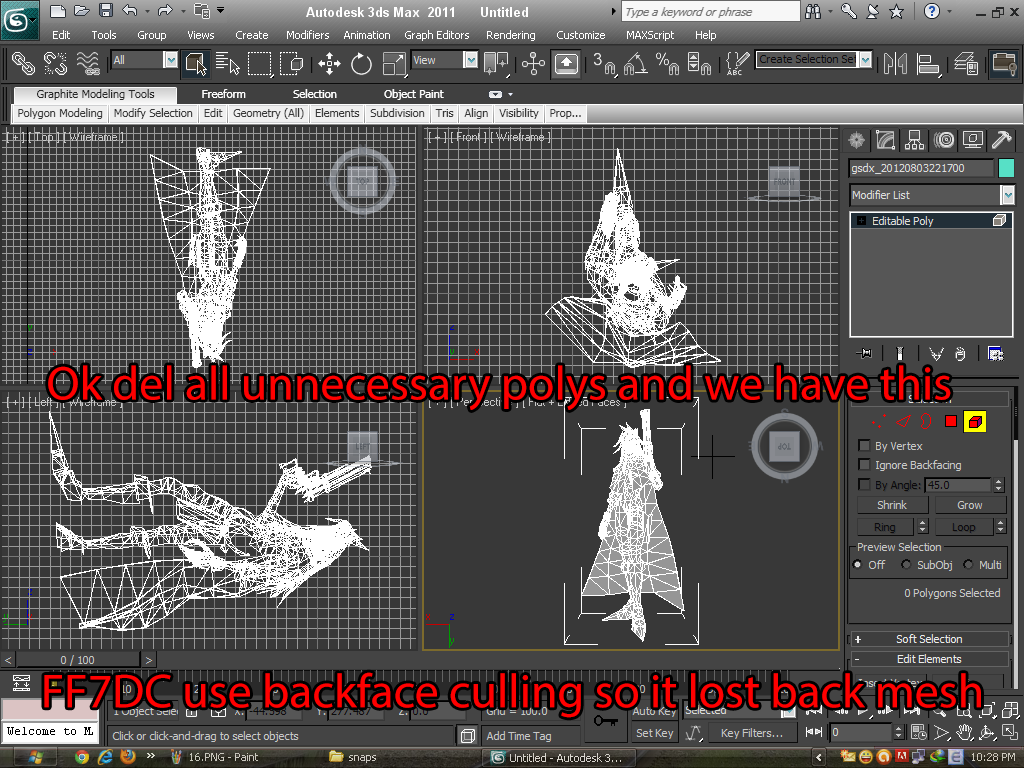
now for some reason PCSX2 seems to capture everything twice so just select and delete what you find is extra or unnecessary.

you may have noticed that the about half the model if black. just select the polygons that are and flip it's normals.
Image
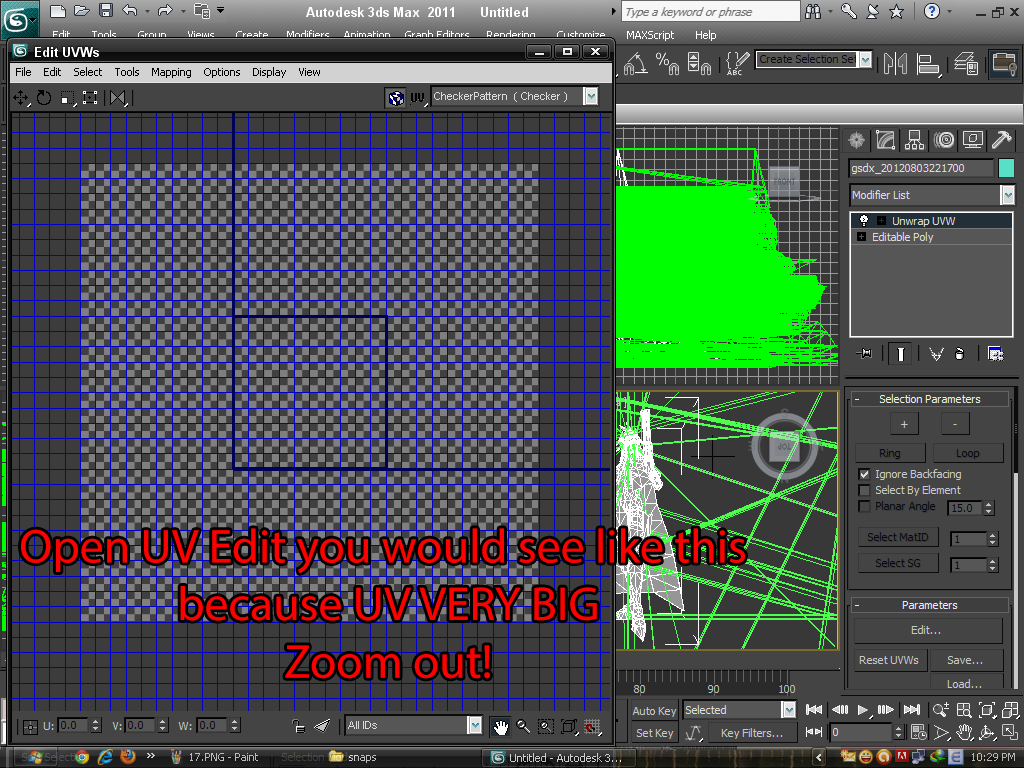
Now find an object and apply its texture. you may get something like this.
Image
what you need to do is flip the UVs vertically and scale them down since they are way over sized. do this for every object and once you are done you should have everything complete
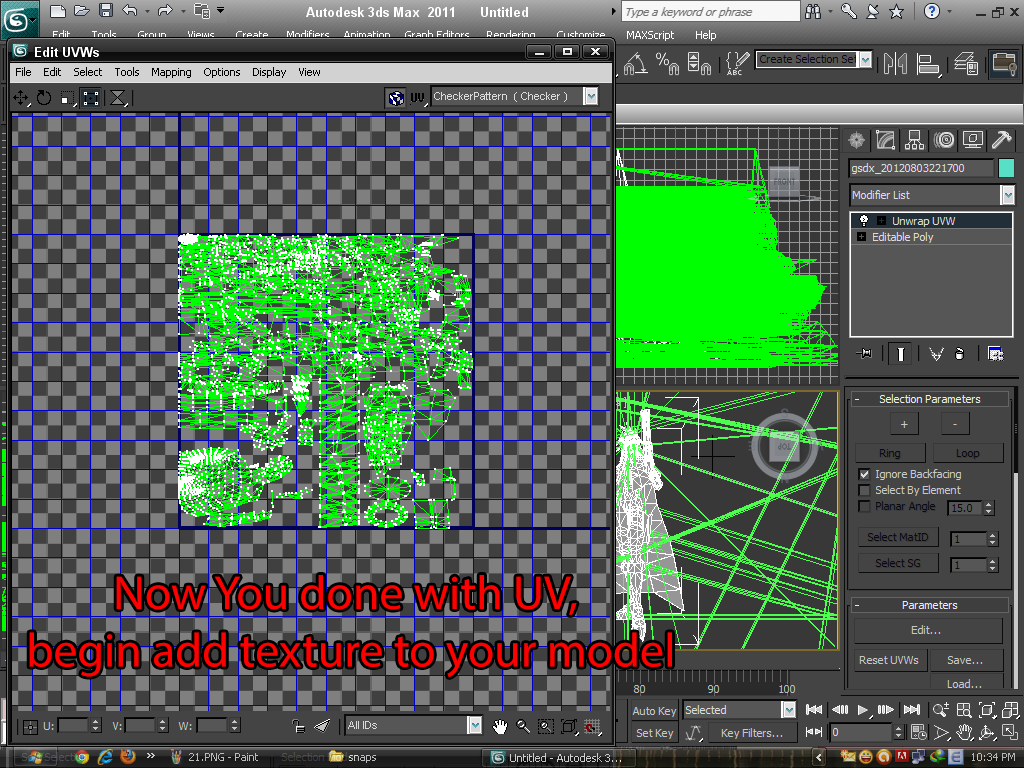
Image
Image
Image
fin
Image
LUBDAR
veteran
Posts: 95
Joined: Wed Jun 08, 2011 7:14 am
Has thanked: 18 times
Been thanked: 9 times

Re: [Tutorial] Ripping PS2 3D Model with picture

Post by LUBDAR »

thanks for posting a little more detail on the UV flipping, I learn best by example...
huckleberrypie
ultra-veteran
ultra-veteran
Posts: 351
Joined: Mon Apr 26, 2010 6:51 am
Has thanked: 105 times
Been thanked: 15 times

Re: [Tutorial] Ripping PS2 3D Model with picture

Post by huckleberrypie »

What PCSX2 revision did you use in ripping your model? I did manage to rip things off a Strawberry Shortcake game, but while it is intact, some of the faces end up getting culled.
User avatar
CriticalError
double-veteran
double-veteran
Posts: 678
Joined: Sun Jul 05, 2009 2:03 am
Has thanked: 104 times
Been thanked: 41 times

Re: [Tutorial] Ripping PS2 3D Model with picture

Post by CriticalError »

thanks a lot for great tutorial, very cool work.
LUBDAR
veteran
Posts: 95
Joined: Wed Jun 08, 2011 7:14 am
Has thanked: 18 times
Been thanked: 9 times

Re: [Tutorial] Ripping PS2 3D Model with picture

Post by LUBDAR »

I was looking into it again, and I think that scaling to 0.3 is better than 0.5, it should take care of the small nuances

For the UV part, I got it flipped, but scaling seems to be an issue, is there a rough estimate that I can key in rather than clicking and dragging. That approach seems to use a lot of my computers resources...


EDIT: AHHH nevermind, its just taking time moving things around...
LUBDAR
veteran
Posts: 95
Joined: Wed Jun 08, 2011 7:14 am
Has thanked: 18 times
Been thanked: 9 times

Re: [Tutorial] Ripping PS2 3D Model with picture

Post by LUBDAR »

Here's some pictures that illustrate the issue I'm facing with this method,
Image
I didn't flip normals on this guy yet, because it would seem like a lot of work for a distorted model.

Maybe its all about the camera angle; I'm not sure. But this also apparently affects the UV layout. It appears that after rescaling, that your map is still in the appropriate shape, however what I've found for my files are that some are rotated,tapered and frequently overlap.
So i'm having to go through the slow process of re-organizing/mapping...I'll post process pictures of what I'm dealing with soon to help out anybody else having this issue
omfgpota
advanced
Posts: 67
Joined: Tue Apr 13, 2010 2:52 pm
Has thanked: 31 times
Been thanked: 1 time

Re: [Tutorial] Ripping PS2 3D Model with picture

Post by omfgpota »

hi can i ask how you managed to get the obj files? because all i get are the bmp snapshot and the gs files. is there any option to turn on the obj? I tired this on persona 3 fes

thanks
The Chief
veteran
Posts: 101
Joined: Fri Oct 09, 2009 3:44 am
Has thanked: 90 times
Been thanked: 10 times

Re: [Tutorial] Ripping PS2 3D Model with picture

Post by The Chief »

omfgpota wrote:hi can i ask how you managed to get the obj files? because all i get are the bmp snapshot and the gs files. is there any option to turn on the obj? I tired this on persona 3 fes

thanks
well you need to select on the DX9 plugin on render DX9 (Software) then ingame shift+F8 , also what version of pcsx2 are you runing?
i have some problems in windows 7 x64 so i use and old revision that works , this a good alternative to 3Dripper and 3dvia. :)
User avatar
youngmark
veteran
Posts: 145
Joined: Thu Sep 02, 2010 1:38 pm
Has thanked: 30 times
Been thanked: 6 times

Re: [Tutorial] Ripping PS2 3D Model with picture

Post by youngmark »

Image
Please help.
Trishty
advanced
Posts: 63
Joined: Mon Jul 05, 2010 2:37 pm
Has thanked: 7 times
Been thanked: 15 times
Contact:

Re: [Tutorial] Ripping PS2 3D Model with picture

Post by Trishty »

huckleberrypie wrote:What PCSX2 revision did you use in ripping your model? I did manage to rip things off a Strawberry Shortcake game, but while it is intact, some of the faces end up getting culled.
Maybe your game use backface culling same as FF7DC in my tutorial. I think you must rip front, back and combine it in 3d program
omfgpota wrote:hi can i ask how you managed to get the obj files? because all i get are the bmp snapshot and the gs files. is there any option to turn on the obj? I tired this on persona 3 fes

thanks
I have try PCSX2 0.9.9.4891 and 0.9.8 official (tested in Win7 64bit and WinXP 32bit). Bolt of it work fine.
Really hope they can make PCSX2 rip model in T-pose
I found this http://www.guildwarsguru.com/forum/texm ... 53495.html
turn off your antivirus may help

PS: Have anyone know how to fix "not enough memory to create 84246 texture-vertices"?
I tried import .obj(10MB) to 3ds max11 in win7 64bit ram4G and i still got this error
LUBDAR
veteran
Posts: 95
Joined: Wed Jun 08, 2011 7:14 am
Has thanked: 18 times
Been thanked: 9 times

Re: [Tutorial] Ripping PS2 3D Model with picture

Post by LUBDAR »

Voila,
Here's what I've done so far, I still need fix some of the UV mapping on his forearms, but the layout was all sloppy and 6 forearms all piled on top of eachother slightly off, makes it hard to work with..
Image


I'm using 0.9.8 on a win64 machine and things worked out fine...
PS: Have anyone know how to fix "not enough memory to create 84246 texture-vertices"?
I tried import .obj(10MB) to 3ds max11 in win7 64bit ram4G and i still got this error
Yeah I took a look at some of the DOC models and mine wouldn't run either...
LUBDAR
veteran
Posts: 95
Joined: Wed Jun 08, 2011 7:14 am
Has thanked: 18 times
Been thanked: 9 times

Re: [Tutorial] Ripping PS2 3D Model with picture

Post by LUBDAR »

Trishty wrote: PS: Have anyone know how to fix "not enough memory to create 84246 texture-vertices"?
I tried import .obj(10MB) to 3ds max11 in win7 64bit ram4G and i still got this error
I couldn't help notice that the model you got was from the model viewer, I believe the poly count on that is way higher than the in-game models, I was able to import an in game model just fine on my system. One of the in-game models of vincent I have is down to 3,292 polys and 9,876 verts....
omfgpota
advanced
Posts: 67
Joined: Tue Apr 13, 2010 2:52 pm
Has thanked: 31 times
Been thanked: 1 time

Re: [Tutorial] Ripping PS2 3D Model with picture

Post by omfgpota »

I tried it on pcsx2 v1.0.0 and yup i tried all dx9 versions both software and hardware, but to no avail i still capture only the gs file and the bmp. maybe it doesnt work on this game(p3fes) or this version i suppose? I'll try the version that you've said which is 0.9.8.

thanks, i'll update you soon
User avatar
Jecht
n00b
Posts: 11
Joined: Thu Jan 26, 2012 2:32 am
Has thanked: 3 times

Re: [Tutorial] Ripping PS2 3D Model with picture

Post by Jecht »

omfgpota wrote:I tried it on pcsx2 v1.0.0 and yup i tried all dx9 versions both software and hardware, but to no avail i still capture only the gs file and the bmp. maybe it doesnt work on this game(p3fes) or this version i suppose? I'll try the version that you've said which is 0.9.8.

thanks, i'll update you soon

It work on that one. I've probe by my self to and it work.
Sadly it not work in lower versions.


Now for the thing: IT JUST WHAT I WAS WAITING FOR YEARS!!! more for some games that they don't extract some models! Like the post I've done month ago of get the keyblades of the KH1, well. with this its plenty possible:


Image
Image


Include, it work plenty good with not lost of anything thing!
Image
^GTA SA BTW


If any ask: I've done with the emu 9.8 on windows 32 AND XP OLD. include just have 256 of video (HALF) and just the enough CPU for make work just one video plugin on the list of the emu (the first one).


And it looks like it can get some scenery but get one big one it gonna be hell hard...
*Sorry for my English, But that is what you got for learn alone*
LUBDAR
veteran
Posts: 95
Joined: Wed Jun 08, 2011 7:14 am
Has thanked: 18 times
Been thanked: 9 times

Re: [Tutorial] Ripping PS2 3D Model with picture

Post by LUBDAR »

I think the camera angle is a big factor for this method to work, I was trying this on Resident Evil:Code Veronica and even from an attempted straight angle, all I got was a weirdly scaled mode.... My guess is that for games where you can orient the camera will work well for this method...
Post Reply