DX Ripper
Posted: Tue Jul 17, 2012 6:06 am
Hi there, Xentax's community!
Let me introduce you to the old-new russian tool for ripping 3D-models from games:
DX Ripper (working tittle) by black_ninja!
The main difference from Ukrainian 3D Ripper DX is that this tool captures the scene before the shaders transform it, and characters remains in the T-pose. Other geometry also captures without rotation or deformation.
This project is two years old and remain mostly unknown to community before HaCKer_UTD started a topic about this tool in Tosyk's forum.
Four days later black_ninja appears in topic with suggestion to improve this tool if somebody interested and helps with testing.
For this moment work suspended again, because black_ninja is busy with other project and don't have a time and motivation to continue develop this tool. Maybe someday in future.
How this tool works:
You'll need a copy of MilkShape 3D, because ripped meshes can be opened only through plugin for MS3D (included with ripper's package). It's main disadvantage of that tool i think.
There's two different ways to inject ripper in game:
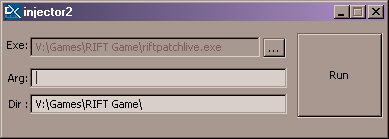
1. Automatic but not so efficient - start injector.exe from folder where you unpack ripper, a window appears:
where:
"Exe:" - path to target game's executable, "Arg:" - game command line options if need, "Dir:" - folder for save captured geometry and textures.
After this small setup you'll press big "Run" button and game starts, ready for ripping (or fails ).
).
2. Advanced and complicated a little - copy intruder.dll and settings.ini to target game's folder (where main executable is) then rename intruder.dll to d3d9.dll and start game as usual.
After injecting you can use F10 key for full scene capture, F9 to capture only textures and F11 for shaders only. Keys can be changed by manually editing key codes in settings.ini with notepad. Key codes can be found here for example.
If rip succesful, a subfolder _ripper\frames\frame00 (then _ripper\frames\frame01, _ripper\frames\frame02, etc.) created in your target folder for rips if you use launcher, or in game folder where renamed intruder.dll is:

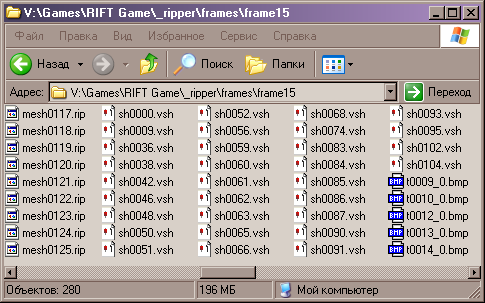
There's no special messages on screen like in 3D Ripper DX, so you'll need to Alt-Tab from game and check out result.
One rip creates one folder about 50-200 megabytes in size, so make sure you have enough space on hdd.
Important note: If you quit from game after making some rips, then start ripping again, captured folders overwrites, so good practice is to rename them after capture session like i did here:
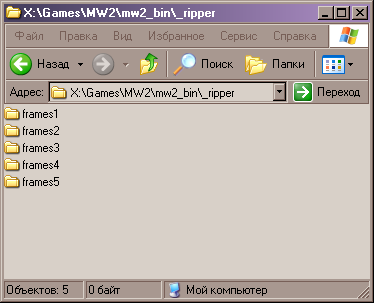
(i add a number to "frames" folder after each session)
Importing to MilkShape:
Copy included plugin msripimp2.dll to MilkShape 3D main folder.
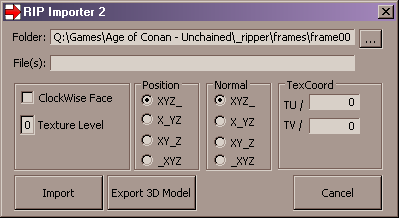
Start MS3D and go to File > Import > RIP Importer 2
a window pops up:
where:
"Folder:" - path to rip's folder, "File(s):" - numbers of meshes to import, "ClockWise Face" - option to invert normals if need, "Texture Level" - numberof texture layer, "Position" and "Normal" - rarely used options for handling geometry, "TexCoord" - options to fix UV map placement in 0-100 range.
Usually you don't need to change anything, press "..." button, select folder containing captured geometry (.rip files), type numbers of meshes to import in 0-12 or 1, 3, 15 format and press "Import" button.
Unfortunately sometimes you import series of meshes like 12-31 they imports messed up, but if you import these meshes one-by-one all go fine.
Numbers in texture names equivalent to numbers in names of meshes, but textures not duplicates for every mesh that uses this texture, only for first captured.
So if you found character body texture with number 0002 in name and next texture have number 0007, you can surely import meshes 2-6 for getting body model.
Noesis import plugin here.
Let me introduce you to the old-new russian tool for ripping 3D-models from games:
DX Ripper (working tittle) by black_ninja!
The main difference from Ukrainian 3D Ripper DX is that this tool captures the scene before the shaders transform it, and characters remains in the T-pose. Other geometry also captures without rotation or deformation.
This project is two years old and remain mostly unknown to community before HaCKer_UTD started a topic about this tool in Tosyk's forum.
Four days later black_ninja appears in topic with suggestion to improve this tool if somebody interested and helps with testing.
For this moment work suspended again, because black_ninja is busy with other project and don't have a time and motivation to continue develop this tool. Maybe someday in future.
How this tool works:
You'll need a copy of MilkShape 3D, because ripped meshes can be opened only through plugin for MS3D (included with ripper's package). It's main disadvantage of that tool i think.
There's two different ways to inject ripper in game:
1. Automatic but not so efficient - start injector.exe from folder where you unpack ripper, a window appears:
where:
"Exe:" - path to target game's executable, "Arg:" - game command line options if need, "Dir:" - folder for save captured geometry and textures.
After this small setup you'll press big "Run" button and game starts, ready for ripping (or fails
2. Advanced and complicated a little - copy intruder.dll and settings.ini to target game's folder (where main executable is) then rename intruder.dll to d3d9.dll and start game as usual.
After injecting you can use F10 key for full scene capture, F9 to capture only textures and F11 for shaders only. Keys can be changed by manually editing key codes in settings.ini with notepad. Key codes can be found here for example.
If rip succesful, a subfolder _ripper\frames\frame00 (then _ripper\frames\frame01, _ripper\frames\frame02, etc.) created in your target folder for rips if you use launcher, or in game folder where renamed intruder.dll is:
There's no special messages on screen like in 3D Ripper DX, so you'll need to Alt-Tab from game and check out result.
One rip creates one folder about 50-200 megabytes in size, so make sure you have enough space on hdd.
Important note: If you quit from game after making some rips, then start ripping again, captured folders overwrites, so good practice is to rename them after capture session like i did here:
(i add a number to "frames" folder after each session)
Importing to MilkShape:
Copy included plugin msripimp2.dll to MilkShape 3D main folder.
Start MS3D and go to File > Import > RIP Importer 2
a window pops up:
where:
"Folder:" - path to rip's folder, "File(s):" - numbers of meshes to import, "ClockWise Face" - option to invert normals if need, "Texture Level" - numberof texture layer, "Position" and "Normal" - rarely used options for handling geometry, "TexCoord" - options to fix UV map placement in 0-100 range.
Usually you don't need to change anything, press "..." button, select folder containing captured geometry (.rip files), type numbers of meshes to import in 0-12 or 1, 3, 15 format and press "Import" button.
Unfortunately sometimes you import series of meshes like 12-31 they imports messed up, but if you import these meshes one-by-one all go fine.
Numbers in texture names equivalent to numbers in names of meshes, but textures not duplicates for every mesh that uses this texture, only for first captured.
So if you found character body texture with number 0002 in name and next texture have number 0007, you can surely import meshes 2-6 for getting body model.
Noesis import plugin here.

